Let’s be honest: HDR can feel like a magic trick and a puzzle wrapped together. One moment your game looks breathtaking, the next an explosion blows out into a white blob or shadow detail disappears like it never existed.
HGiG Mode is one of those settings you’ll see in Playstation/Xbox menus and TV picture presets — and people argue about it like it’s the final Photoshop slider you’ll ever need. The short version: HGiG tries to make the HDR picture match what the game developer intended by telling your TV to step back and let the console or game handle the heavy lifting for tone mapping.
That can fix weird double-processing problems, preserve detail in bright or dark areas, and make HDR look more faithful. But it isn’t a silver bullet. Depending on your TV, the game, and whether you bother to calibrate things once, HGiG can be a clear win — or it can look too dim or flat. Below I’ll walk you through what HGiG actually does, how it works, when to turn it on, how to test it, and what to do if it doesn’t look right — all in plain English.
I’ve tested HGiG on multiple displays in my own setup — including an LG OLED and a mid-range QLED — and the difference can be surprisingly noticeable. On the OLED, HGiG preserved highlight detail in bright sky scenes that were slightly blown out with Dynamic Tone Mapping. On the QLED, the effect was more subtle and sometimes looked dimmer unless I re-ran console calibration. That’s why setup matters more than the toggle itself.
Also Read: QHD vs 4K: Is 4K Worth the Upgrade?
Quick Answer: HGiG Mode
HGiG mode lets your console handle HDR tone mapping instead of your TV. When properly calibrated, it prevents “double tone mapping,” preserving highlight and shadow detail so games look closer to the developer’s intent. It works best when your console HDR settings are correctly configured.
What is HGiG?
HGiG stands for the HDR Gaming Interest Group, an industry consortium formed by companies like Sony, Microsoft, LG, Panasonic, and Samsung to standardize HDR gaming behavior (as outlined on the official HGiG site).
It was formed in 2018 specifically to solve the growing inconsistency in HDR gaming across different TV brands.
It’s not a new HDR format like Dolby Vision or HDR10+. Instead, HGiG is a collaboration between console makers, TV manufacturers, and game developers that provides guidelines so HDR games and TVs can cooperate and produce a more accurate image.
The goal is simple: let the game or console handle HDR mapping once, correctly, based on your TV’s real capabilities. When the TV also applies its own tone mapping on top, it creates “double tone mapping,” which can crush highlights, flatten contrast, or hide important detail.
How Does HGiG Work?
At its core, HGiG is about communication and tone mapping. Tone mapping is how an HDR signal (which can include brightness levels beyond what your TV can physically show) gets translated to the actual range your screen can reproduce.
If you’re new to HDR in gaming, you may also want to read my breakdown of what HDR actually means for gaming performance, because tone mapping only makes sense once you understand how HDR brightness and contrast behave in real gameplay.
- Identify the display. The console queries the TV (or uses a database) to know the TV’s peak brightness and other characteristics.
- Console does tone mapping. Instead of the TV doing its own aggressive tone mapping, the console/game takes responsibility and maps HDR content to the TV’s known capabilities. That preserves the developer’s intent.
- User calibration stays relevant. The console-level HDR calibration you perform (like PS5’s Adjust HDR) tells the game the ceiling and helps the game place highlights and shadows correctly. The TV then avoids re-processing that output.
An important part of all this is that HDR content carries a much wider range of brightness and color than SDR. That expanded color capability is known as wide color gamut (WCG). If you’re not familiar with how color gamut and color depth affect HDR performance, I’ve explained it in detail in my guide on color gamut vs color depth. Understanding that difference makes it easier to see why HGiG helps games use your TV’s full color and brightness range properly.
A Quick Technical Note: What the Console Needs to Know
The console needs a few numbers (or a “category”) from the TV: what the display’s max luminance is, how the display handles blacks, and whether it can reproduce a particular color volume. With those, a game can tone-map scenes so highlights don’t clip to white and shadows don’t turn to mush.
An Example of an Undesirable User Experience
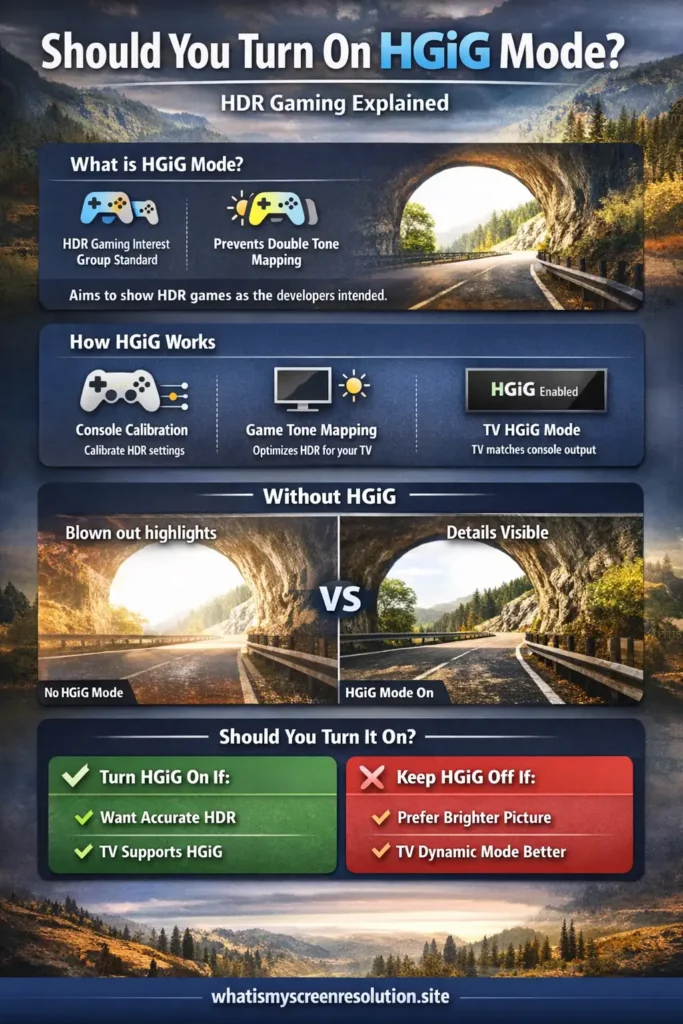
Imagine you’re in a racing game. A tunnel exit is ahead, with bright daylight spilling in. The game intends for the tunnel mouth to be bright, but with useful detail: a sign, the curve of the road, a guardrail.

If your TV first accepts the console’s HDR output, then applies its own tone mapping on top (double tone mapping), it can blow out the tunnel exit — everything becomes one big white area. Players who rely on visual cues could miss the turn. That exact kind of loss of detail is what HGiG tries to stop.

Many demonstration shots show two screenshots side-by-side: with HGiG enabled you can see the turn and details in the bright area; without it, those details vanish. That’s why accuracy matters — not just “brighter looks better.”
HGiG in Practice — Consoles, TVs, and Games
So how does this work in the real world? Here are the practical bits you’ll run into.
Which Consoles Support it?
Modern consoles that work with HGiG concepts include PlayStation and Xbox platforms. Both consoles let you calibrate HDR and provide the information needed for game-level tone mapping. The console’s HDR calibration step (like PS5’s Adjust HDR) is important because it tells the game/console how bright your display actually is. Microsoft and Sony were key players in forming HGiG, so console support is baked into workflows.
Which TVs Support it?
Some TVs expose an “HGiG” mode or a “Game HDR” mode that disables the TV’s dynamic or automatic tone mapping so the console can do its job. Brands that commonly support HGiG include LG OLED (Game mode/HGiG), Samsung QLED (game modes), Panasonic OLED, and others — but support varies by model and firmware. If you want to be sure, check your TV menu for an HGiG toggle or a Game picture preset. If you don’t see it, your TV might still be compatible but expose similar behavior under different names.
Do Games Support HGiG?
Only some HDR-enabled games explicitly integrate HGiG guidance as part of their HDR implementation. Even when a game doesn’t have a labeled HGiG toggle, many modern games follow best practices (histogram-based tone mapping, providing sliders for in-game HDR brightness, etc.). When a game does support HGiG, the combination of console calibration + HGiG-mode TV should give you a faithful picture.
If you’re gaming at 4K with HDR enabled, your console or GPU is already working harder than at 1080p. That’s why proper tone mapping and calibration through HGiG Mode can make a visible difference without unnecessary brightness processing.
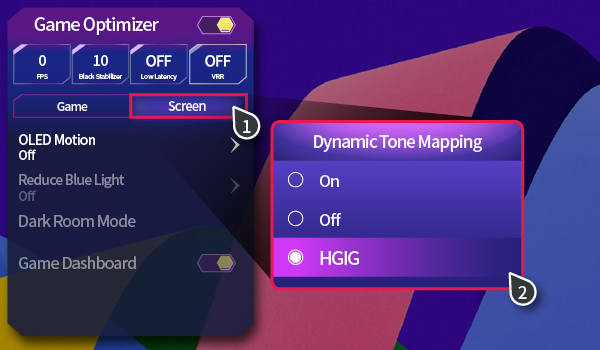
Where to Enable it
On consoles: perform the HDR calibration first (PS5 has Adjust HDR, Xbox has a similar calibration workflow). On your TV: try switching to Game Mode and enable an HGiG option if present. On some TVs this is in the HDR settings, on others in a Game picture preset.
Microsoft’s official Xbox HDR TV settings guide recommends calibrating HDR before adjusting TV presets — something I strongly agree with after testing different configurations. If you follow Microsoft’s guide for HDR TV settings you’ll be in a better place to decide whether HGiG helps you.
Should You Turn on HGiG?
Try HGiG if:
Consider leaving HGiG off if:
In other words, HGiG is for accuracy; dynamic tone mapping is for visual punch. One is not objectively better for every situation — it depends on the game, the TV, and your taste. Audio-visual publications like What Hi-Fi have also explained this distinction clearly, noting that HGiG prioritizes accuracy while Dynamic Tone Mapping often prioritizes brightness and impact.
How to Test HGiG — Quick, Practical Steps
- Calibrate console HDR first. Use PS5’s Adjust HDR or the Xbox calibration tools. This gives the console accurate data about your display.
- Enable HGiG on the TV (or Game mode + HGiG). If your TV doesn’t explicitly say HGiG, use its Game Mode which typically reduces processing.
- Pick a game you know well and that’s known to have a decent HDR implementation (open-world, bright highlights, shadows). In my testing, games like Forza Horizon and Assassin’s Creed Valhalla showed the clearest differences between HGiG and Dynamic Tone Mapping, especially in bright sky scenes and sunset lighting.
- Compare HGiG ON vs OFF. Take note of bright highlights, shadow detail, color richness, and how natural faces or skies look.
- Adjust in-game HDR sliders if available. Some games give you exposure or max luminance sliders — set them while HGiG is on for best developer-intended mapping.
- If it looks too dim, try turning HGiG off and note whether the TV’s dynamic tone mapping gives a version you prefer. There’s no shame in picking the version you like most.
If you need a step-by-step reference, Xbox’s HDR TV Settings guide is a good place to start.
Pros and Cons — HGiG
Pros
Cons
Troubleshooting common issues
If HGiG makes things look worse:
Also Read: HDR10 vs HDR10+ vs Dolby Vision: What Wins in 2026?
Conclusion
In my experience, HGiG is worth trying — but only after you’ve calibrated your console properly. When I skipped calibration, it looked dim and underwhelming. Once I set HDR correctly, highlight detail improved and games looked more natural.
If the result seems too dim or you prefer punchier visuals, switch back and compare. There’s no single “best” setting for everyone. HGiG exists to solve a real problem (double tone mapping), and in many setups it improves detail and fidelity. In others, especially with aggressive TV algorithms or poorly implemented game HDR, you may prefer the TV’s dynamic tone mapping. Test both, and pick the one that gives you visibility and that look you enjoy.